   __   __                      __
  / /  / /__ ___ ___  _______  / /_
 / _ \/ / -_) -_) _ \/ __/ _ \/ __/
/_.__/_/\__/\__/ .__/_/  \___/\__/
              /_/

 ~ the machine is deeply symptomatic ~
home writing fortunes library links
           _.-''|''-._
        .-'     |     `-.
      .'\       |       /`.
    .'   \      |      /   `.
    \     \     |     /     /
     `\    \    |    /    /'
       `\   \   |   /   /'
         `\  \  |  /  /'
   jgs  _.-`\ \ | / /'-._
       {_____`\\|//'_____}
               `-'
the shell (the command-line)
Linux is an operating system (OS) just like Windows and MacOS are operating systems, but it differs in many ways.
The primary means of interacting with a Linux system is through the *shell* (there do exist graphical environments for Linux, but for our class we will work primarilly with the *shell*). Some folks refer to this as a *command-line* interface or a *terminal user interface* (this is a call-back to how user originally interacted with early computers...using a *terminal*). For this tutorial (and to avoid further confusion) I will use the *shell* terminology.
Working directly with an OS shell can be intimidating at first, but it just takes some practice. Follow along in this tutorial on your emulated system.
first boot
When you first boot-up and log into your system you should be greeted with the following text:
student@cs $This is your *shell prompt* (it is prompting you for a command). You will enter commands and the OS will process commands exactly as you have entered them. There are a **lot** of commands, so the easiest thing to do is to just learn them as you go.
Each header in this tutorial will start with a list of commands and will then walk you through examples of how to use them.
navigation
* pwd - print working directory
* cd - change directory
* ls - list files / list directory contents
These commands are primarily used for navigation around the
system. Something to keep in mind is that there is no 'desktop', so you are
always 'in' a specific directory on the computer. When we first log into the
system we have a location which can be given to us by the
‘pwd’ command.
student@cs $ pwd
/home/student
student@cs $
As you can see I am in my *home* directory (
‘/home/student’ ). If I enter the
‘ls’ command the OS will list out the
contents of the directory that I am currently located in (in this case
‘/home/student’ ).
student@cs $ ls
Desktop   Downloads builds    documents kicad     projects
student@cs $
There are other directories nested under my home directory. I can
move into one with the ‘cd’ command
(i.e. change directory to a new location).
student@cs $ cd documents/
student@cs $ pwd
/home/student/documents
student@cs $ ls
topsecretplans.pdf                      x86_vol1.pdf
Forthprimer.pdf                         x86_vol2.pdf
w65c02s.pdf                             x86_vol3.pdf
w65c22.pdf                              x86_vol4.pdf
student@cs $
In this example I used ‘cd’
to enter the ‘documents’ directory.
Then, when I used the ‘pwd’ command
you can see the OS showed me my new location (
‘/home/student/documents’ ). Finally,
I entered the ‘ls’ command and the OS
listed the contents in that directory (a handful of PDFs).
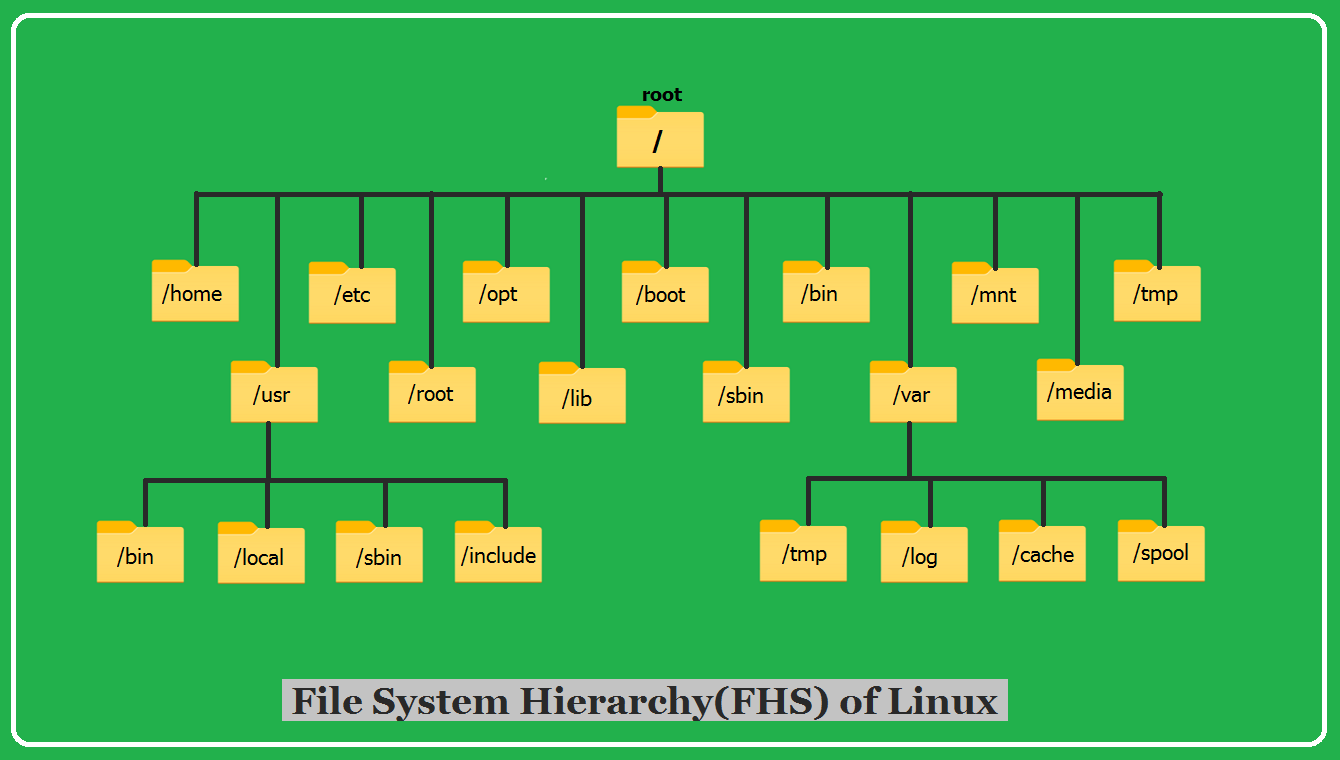
The files on your system are stored in a nested tree structure called a file hierarchy. It looks like this:
Each directory has a specific purpose, but you will spend most of
your time in your home directory. User home directories are located in
‘/home’
<my>
examples my username is ‘student’ , so
my home directory is ‘/home/student/’
All of my other personal directories are located within this one.
The path of a file is it's full location. For example, the path of
my 'topsecretplans.pdf' file is
‘/home/student/documents/topsecretplans.pdf’
, and the path of the 'documents' directory is
‘/home/student/documents’
You can use ‘cd’ with a
*relative* path or an *absolute/full* path. In my examples I was using
‘cd’ with a relative path (i.e.
‘cd documents’ changes to the
documents directory which is in my home directory), but if I was in a
completely different location and I wanted to change into that directory I
could use: ‘cd
/home/student/documents/’
working with files
* mkdir - make a directory
* mv - move a file
* rm - remove a file
* cat - concatenate files (also shows the content if used with a single file)
* nano - edit a file (nano is a simple text editing program)
These commands are pretty simple. Let's start in our home
directory. Then use the ‘mkdir’
command to create a new directory called *projects*.
student@cs $ pwd
/home/student
student@cs $ mkdir projects
student@cs $ ls
Desktop   Downloads builds    documents kicad     projects
student@cs $
As you can see we now have a *projects* directory.
‘cd’ into it and if you
‘ls’ again you should not see any
files (because the directory is empty). Then, enter
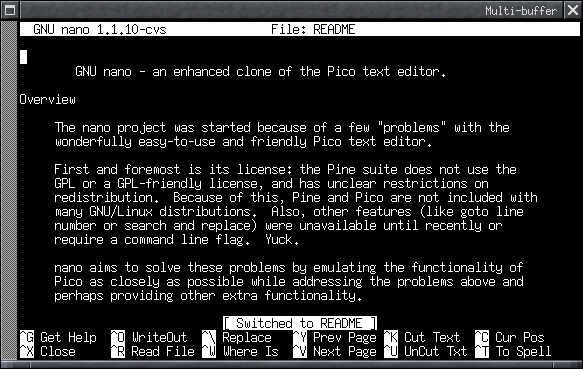
‘nano a_text_file.txt’ You should be
greeted with the nano text editor open on a blank file. It should look like
this (but without the extra text in the file):
The nano editor is incredibly simple. All of commands are listed
on the bottom of the screen (the ^ symbol indicates the control key, so to
quit from nano you would use Ctrl-x, or to save the file you would use the
write-out command which is Ctrl-o). Type in the file a bit and then save the
file and close nano. Now, you can use the
‘cat’ command to see the contents of
the file:
student@cs $ cat a_text_file.txt
Here is some text in my file!
student@cs $
Really the ‘cat’ command is
for concatenating files together, but it also dumps the content of a file so
we can use it for a single file to just view the content. For now, just know
that it is helpful for quickly seeing what is in a file.
The ‘mv’ command actually
takes two arguments ( ‘mv <target_file>
<destination>’ ). We also use it to rename files. In the
following example we move
‘a_text_file.txt’ to
‘new_name.txt’
student@cs $ mv a_text_file.txt new_name.txt
student@cs $ ls
new_name.txt
student@cs $

The
‘rm’
command just deletes files.
programming in C
* cc - c compiler

Okay now we can get some programming. Let's start in our
‘projects’
directory, and create a new directory called
‘project0’
main.c’
type in the simple program below,
write the file, and close nano.
a.out’
For historical reasons this is the
default filename output from the c compiler. Finally, we can execute the file
with
‘./’
conclusion
This tutorial is tiny! This is only scratching the surface of what the shell is
capable of. The OS shell is actually a functional programming language and can
be used to program your OS. That being said, this introduction should be
sufficient for our class this year. Come back when you need a refresher. Here is
a summary of the commands covered:


* pwd - print working directory


* cd - change directory


* ls - list files / list directory contents


* mkdir - make (create) a directory


* mv - move a file


* rm - remove a file


* cat - concatenate files (also shows the content if used with a single file)


* nano - edit a file (nano is a simple text editing program)


* cc - c compiler